
As owners of a Duplex home, it’s safe to say we have a healthy number of keys to manage. Not only are we looking after our own home and car keys but the duplex’s exterior door key, our tenant’s spare keys, etc. Without a designated drop spot for them when you walk in the front door, our keys often end up in scattered, hard to find places throughout the home. And it makes for a frantic struggle when you need to dash out the door in a hurry. So when Dremel challenged me to share a small space solution as part of their month-long August Maker Days (more on this in a bit!), it was a no-brainer which area to tackle. Key Storage in the Entry.
Because our entry is a small space, I knew the key holder had to be wall mounted, and I found inspiration in this only-sold-in-Danish-stores key holder. Normally making a wall-mounted key holder with key chain slots & recessed keyhole hangers would require 3 big-daddy tools: belt sander, mitre saw and router, but instead I’m simplifying things and using the Dremel 8050 Micro, a handheld rotary tool that satisfies all 3 tool needs in one. (It’s kind of amazing!)
If you too need to organize your home’s key situation, check out the modern key holder solution I made for my entry. No more frantic key searching for this gal!


Materials:
- Dremel 8050 Micro
- 1″ x 2″ Piece of wood cut to 5-1/2″ L
- 2 Small keyhole hangers
- Screwdriver
- 1.5 mm Round leather cording
- 4 Gold jump rings or split rings
- 4 Caged necklace pendants (I picked these up at Michael’s, and it looks like they’re only available in stores.)
- Wire cutter
- Needle Nose Pliers
- Scissors
- Pencil
- Ruler
Note: While you’re gathering materials, make sure your Micro is on the charger (or already charged). The charge time is about 3:45 minutes.

For the Wood Key Holder:
- Sand the 1×2 Board: Depending on the cut of wood, you’ll likely need to start with one of the coarse grade sanding discs and work your way to the finest one. Attach a coarse grade sanding disc onto the EZ Drum Mandrel and lock it into place on the rotary tool. In a smooth continuous motion, move the sanding disc over the surface of the wood removing any rough splinters on the surface. Next switch to a medium grade disc and then to a fine grade disc until completely smooth.
- Mark for Keyhole Hangers: Determine what will be the front & back of the holder, and trace around the keyhole hangers on the back side.
- Rout Recesses for Keyhole Hangers: Use the Micro’s engraving cutter to rout out an 1/8″ recess following the pencil outline created in step 2. Then rout an additional 1/8″ recess only in the location where the screw head will enter the keyhole hanger. Smooth the rough routed surface with the same Micro sanding discs used in step 1.
- Attach Keyhole Hangers: Screw in keyhole hangers using a simple screwdriver or cordless drill (depending on wood hardness).
- Mark Key Chain Slots: Evenly space the 4 slots across the front of the holder.
- Cut Key Chain Slots: With the Micro’s cutting wheel attachment, create 3/8″ – 1/2″ deep slots for the key chains.
Tip: When making the key chain slots with the cutting wheel, it’s helpful to make several passes back and forth across the surface to create the slot. For the 2 interior slots, you’ll need to approach the slots from each side as opposed to completely straight on.
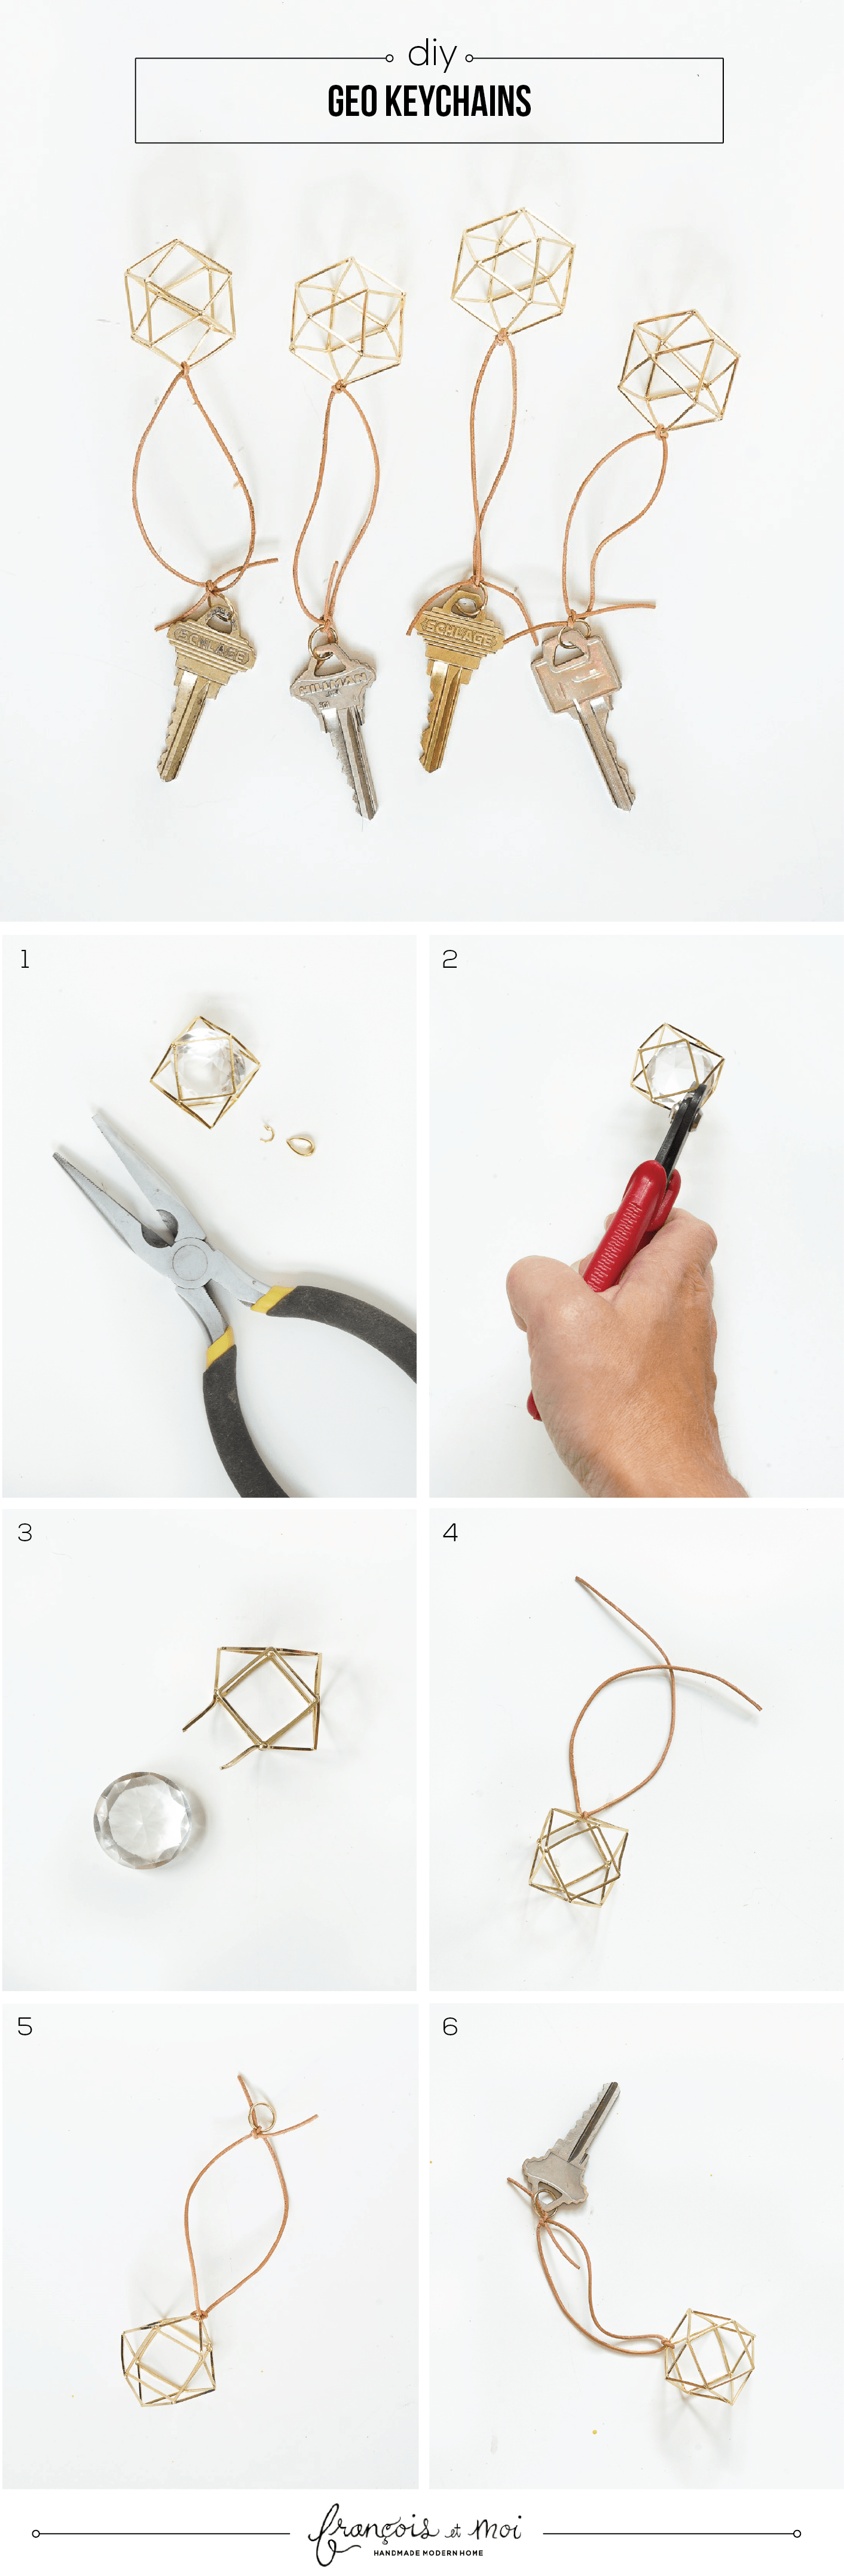
For the Geo Keychains:
1. Remove the Jump Rings: The caged necklace pendants will arrive with a giant crystal in the middle of them. I liked the modern look of the cages without the bling and chose to remove them. Use a needle nose pliers to split the jump rings and take them off.
2. Open up the Geo Cage: Look for a weakly welded connection on the cage and carefully split the connection with a wire cutters.
3. Remove the Bling: Gently bend back the split sides of the cage, and remove the crystal.
4. Attach Wire Cording: Bend the sides of the cage back together and double knot together with a 9″ piece of leather cording.
5. Attach Jump Rings: At the opposite ends of the cording, attach a jump ring (or a more traditional split ring) by tying it right into the double knot.
6. Attach Keys: Slip the key into the jump or split ring. Repeat steps 1-6 with remaining geo keychains.
Last but not least, attach the holder onto the wall with screws and hang the key chains in the slots!
Before You Go! If you’re a maker who’s into power tools, you have to know about Maker Days. During the month of August, they have this month-long celebration called Maker Days dedicated to helping DIY’ers, like you and me, expand our toolboxes. Basically, each day this month, they’re giving away free tools and product offers, including a grand prize of TEN Dremel tools! So. If you want to learn the magic of power tools, or say you’re already a seasoned vet who wants to add to their power tool kitty, head over to Maker Days and stock your toolbox!


Remember these Geo Cheese Tools? They would have been so much easier with the 8050 Micro!
This post has been made possible by Dremel. Thank you for supporting the brands I love that help me keep the DIY inspo flowing direct to your inbox!


Melle Blanche
August 7, 2016 at 7:44 amIt’s so chic !
francoisetmoiblog@gmail.com
August 7, 2016 at 9:36 amThank You Melle!!
Ideas bonitas y fáciles para hacer en un día de lluvia: DIY
August 16, 2016 at 4:01 pm[…] Fuente […]
DIY Wall Vase - Francois et Moi
August 17, 2016 at 11:48 am[…] forward to two weeks ago where I needed something organic to pair with my DIY key holder, so on a whim I pulled out a Command strip and quickly hung a vase of eucalyptus on the wall. I […]
DIY du Jour: 7 Genius Organization Projects for Back to School - Francois et Moi
August 19, 2016 at 10:04 am[…] Desk Caddy from Dream Green DIY // Pocket Organizer from A Lovely Drawer // Modern Key Holder from F&M // Desk Organizer from Lovely Indeed // Magnetic Leather Pen Holder from […]
Charlie Ranger
August 23, 2016 at 1:57 pmSuper cute!
regards,
Charlie Ranger
@littleaholicbycsd
francoisetmoiblog@gmail.com
August 24, 2016 at 10:44 amThanks Charlie!!
50 Cool DIY Projects That Can Make Your Home More Beautiful – Greensboro Baths
September 23, 2016 at 5:39 pm[…] is the key holder. You could make some for your entryway. You can find all the necessary details on Francoisetmoi. The one featured here is simple and chic and to make something similar you need a dremel tool, a […]