
This post has been sponsored by KILZ ® . All thoughts and opinions are my own.
Whether it’s a mountain of clutter in your spare bedroom or a forgotten niche that’s in need of a facelift, we all have those areas in our home that we put on the blinders for in order to make them palatable. (Or at least, I hope we’re not the only ones!) For our family, it was the dreaded back hall, a dingy, bare, tiny space that just wasn’t pulling its weight. So, I’ve teamed up with KILZ Complete Coat® Paint again (remember our medicine cabinet makeover?) to rock this hall and make it feel more like the rest of our home–a spot we’d enjoy coming home to.


The layout is pretty typical for 1930-era homes. You enter the back hall at ground level, and you can either go down into the basement, or turn the corner and head up to the two floors above (our floor + our tenant’s floor—our house is a duplex). What I’m getting at is there are lots of stairs, and not much room for coats, boots, garden stuff, toys, etc., all the things you’d like your back hall or mudroom to accommodate. 


The plan in here is to add pegrail wainscoting along the “long” wall, as well as up the first few stairs to the first floor door, paint the entire hall (walls, trim, and doors), and finish up with functional accessories like a new rug, stool, basket, etc.
When we refreshed the back yard a few years ago, we added a light outside above the door which meant we cracked into the plaster inside to add the electricity. We patched in the plaster, but it was never sanded or painted, and it’s been an eye sore ever since.
The back door is a run-of-the-mill big box metal door that the previous owner added. I’m going to shake things up with Licorice Rope, a delicious black paint color, and give it some zsa zsa zsu. PS – check out the links attached to the KILZ ® products to purchase online from Walmart or head to your local store to pick them up in person!
The door to our floor is an enigma. It’s honey oak in color and doesn’t match the rest of the home’s dark chestnut wood stain, but it is the same door panel style, which makes me think it’s original. All to say, this door is going to be painted the same Licorice Rope black color as the exterior door. Bye, bye Honey Oak!
But enough chit chat, let’s get this DIY party started, shall we?
Materials:
- KILZ 2® Water-Based Primer
- KILZ Complete Coat® – I used colors International Gray, Tea Set White, and Licorice Rope
- 4×8 Sheets of 4” Wide Beadboard
- Pre-made Pegrail
- Pre-primed 1”x 3” Wood Trim
- Pre-primed 1” x 2” Wood Trim
- Extreme Heavy Duty Liquid Nails
- Paintable Silicone Caulking
- Wood Filler
- Painters Tape
- Sandpaper
- Paint Rollers + Brushes
- Paint Trays + Liners
Special Tools
- Skill Saw
- Miter Saw
- Nail Gun
- Drill


Wainscoting
First, things first! We cut our beadboard to size with a skill saw and adhered it to the wall with liquid nails. Since the beadboard was only 1/8” thick it worked beautifully with the existing base trim. Thank goodness, too, because removing that old base would have also torn off some of the plaster and this would have quickly become a much larger project. Once the beadboard was on the wall, we used a nail gun to secure it in place.

Next, we cut down the pre-made pegrail with a miter saw and attached them across the wainscoting with screws. At the stairs, the pegrail was finished off with a coordinating 3” x 1” trim board up the stairs, parallel with the stair stringer.
Also, you’ll notice next to the back door, we cut off a few of the pegs so that the door could open fully. Have I mentioned this is a tight space?!
The next step was to add a “shelf” atop the pegrail which would be useful in holding small objects and leaning pictures on it. The long pegrail wall has a 1” x 3” pre-primed board atop it, and the wall with the stairs has a 1” x 2” pre-primed board. Both were cut down to size with the mitre saw and attached from the top with a nail gun. The finished height of the pegrail wainscoting is 65” from the floor.
Once the wainscoting was fabricated, I went back with paintable silicone caulking to disguise the beadboard seams, as well as with wood filler for the nails.

Paint Color Selection
I ordered several 8oz KILZ Complete Coat® paint samples from Walmart.com in a range of blues, greens, greys and whites to try them out in the back hall. I’m a big believer in trying out the actual paint in the space before committing to a full gallon.
I wasn’t sure if I wanted to do the walls a color and leave the wainscoting a traditional white color, or vice versa, but in the end I went with International Gray in the Satin Finish for the wainscoting to help hide scuffs, and Tea Set White in Flat for the walls to keep the space feeling as light, airy and spacious as possible. 
International Gray is a delicious grey green color that actually looked muddy at first glance next to the other more pure colors. But, as I began eliminating the colors one by one, it came down to International Gray and Sage Pond. I painted larger areas of these two colors and looked at them at different times of the day. Once I saw a larger portion of International Gray, I was sold!
Tea Set White was the obvious choice for the white color. It has a celadon green undertone with a hint of warmth which helps the space feel comfortable and homey, not stark, nor yellow-y either.
Wall Prep
Before any paint went on the walls, I sanded down the plaster patches and wiped the walls and trim down with a damp sponge to remove dust, dirt and sadly even cobwebs.
Priming Plaster, Trim and Doors
Next came priming. I added a healthy coat of KILZ 2 ® Water-Based Primer to the stucco portions of the walls and the doors + trim.
At this point, you might be thinking, ‘Why is she also using primer if she’s planning on using a paint + primer in one?’ That’s a great question. The old stucco walls have an uneven texture, a few stains and a touch of an old-man-grandpa-smoker smell, while the doors and trim are surfaces that aren’t inherently great for paint adhesion. So, the primer is basically setting the project up for success, as uneven textures, stains, smells, and paint adhesion are all issues the primer is great at addressing.
Also! Primer is about $10 cheaper per gallon, so since I’m painting the walls a light color, it’ll act as my “first coat” and save money on the project’s bottom line.

Applying Paint
Once the primer was dry, we taped off any color transitions, the wainscot pegs and along the floor base with painter’s tape. Ken and I went to town with the white color, Tea Set White, for the walls, ceiling and trim. We ended up needing about two coats for full coverage.

From there we started in on the grey-green color (International Gray) for the wainscoting. As with the walls, we needed about two coats for full coverage. As the second coat dried, I was giddy with excitement. The color is so luxe + mellow and has a way of enveloping you when you stand in the hall. That description probably sounds funny, but it’s the only way I can think to really describe it!
Last but not least, the doors! Already primed from earlier, I rolled on a few coats of the black (Licorice Rope), which is a cooler jet black hue. I love the way the black gives the doors a higher end look and contrasts beautifully with the grey-green wainscoting and white walls.
Accessories
The next morning after everything dried, I was able to move our stuff in! Rug, boots, gardening supplies, and a wire basket to hold outdoor gear—lots of functional goodness. Since this is a back hall with all hard surfaces, I wanted to soften things with texture. I chose a braided, natural coir entry mat and hung a straw wreath on the door.
This oil portrait has been in my family for decades. My great aunt painted this of my mom when she was 5 years old. Isn’t it just lovely?!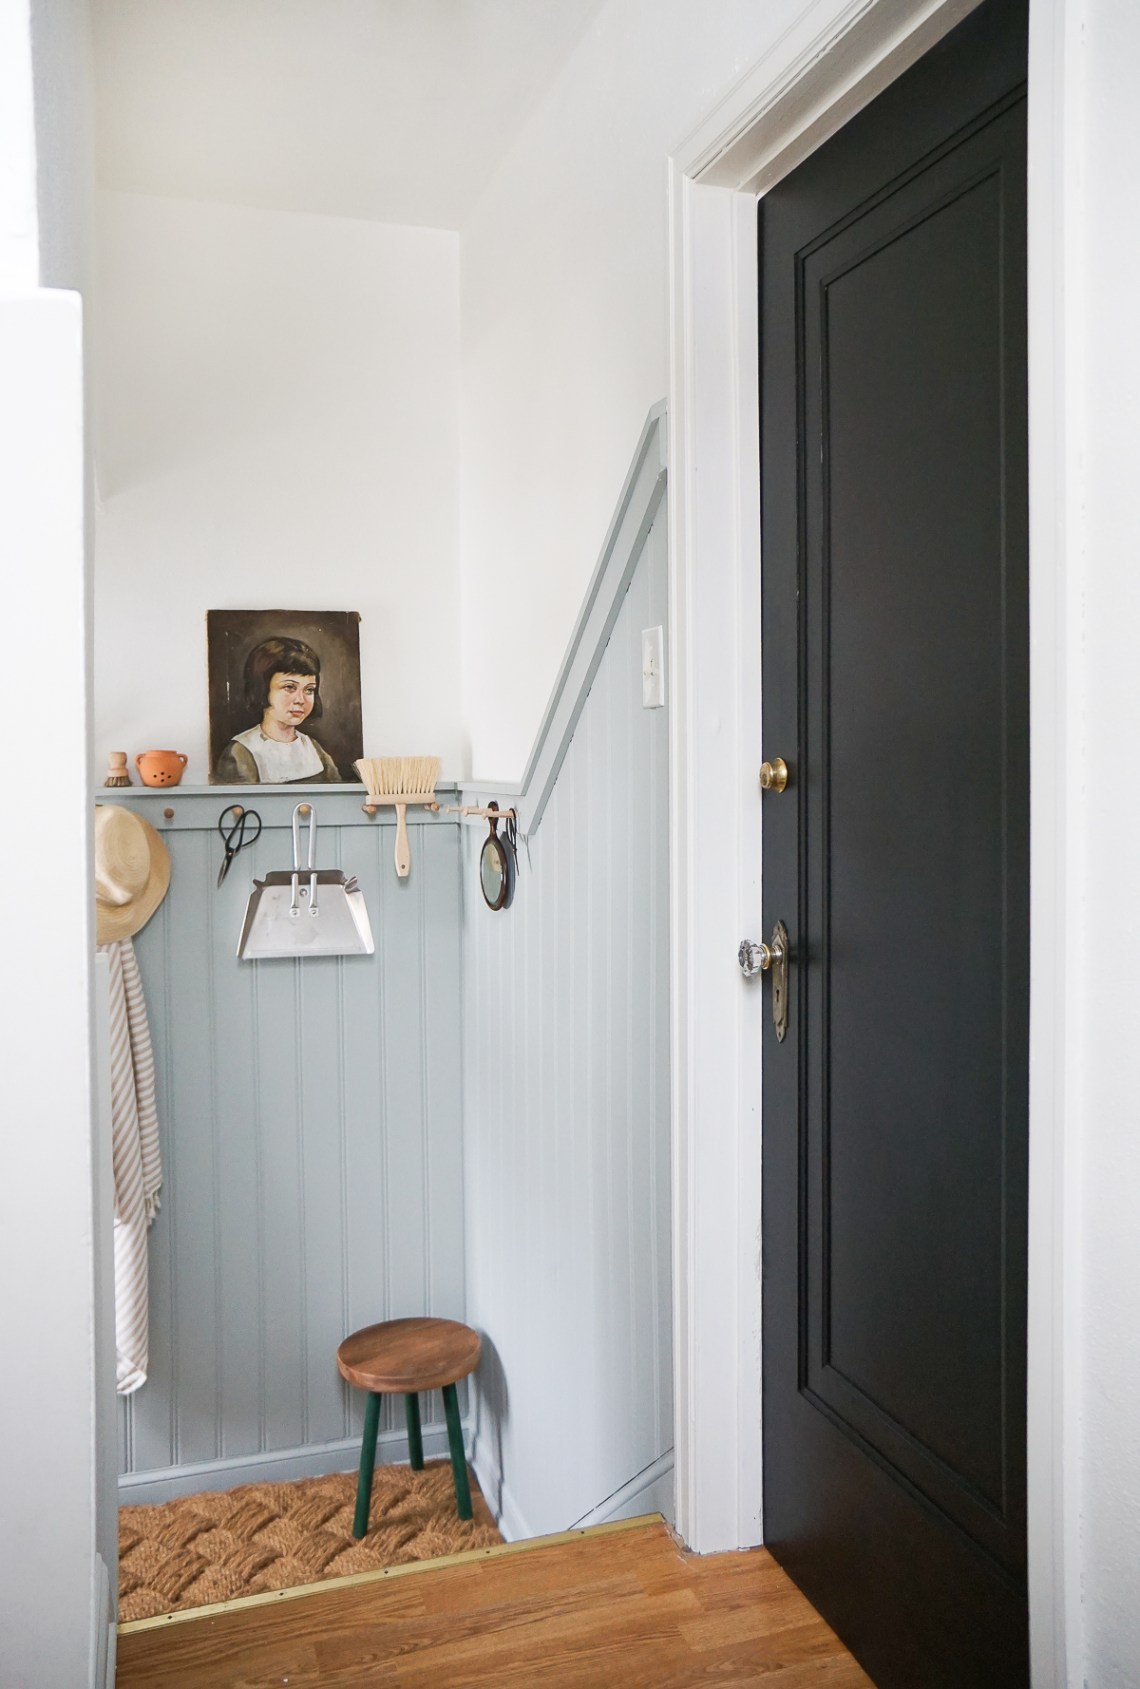
Final Thoughts
The architectural interest, refreshing color wash and functionality we’ve added in this small back entry through a fresh coat of paint, beadboard and pegrails is even better than I could’ve imagined. I’m thinking about introducing a similar beadboard installation on the upper landing too for a cohesive look throughout. Stay tuned for more! And don’t forget you can easily get all the materials you need right from your local Walmart (or Walmart’s online store!).
Tell me what you think! Would you have picked the colors I chose?
Here’s a recap of the paint colors and finishes we used:
- Primer: KILZ 2® Water-based Primer
- Walls and Ceiling: KILZ Complete Coat® Tea Set White, Flat Finish
- Trim: KILZ Complete Coat® Tea Set White, Satin Finish
- Wainscoting: KILZ Complete Coat ®, International Gray, Satin Finish
- Wainscotting Pegs: Natural Wood (no paint)
- Doors: KILZ Complete Coat®, Licorice Rope, Satin Finish


Melle Blanche
April 26, 2018 at 10:15 amVery chic and “maison de famille” !
Felicia
April 26, 2018 at 11:03 amYour makeover is lovely, and I love the color you chose for the wainscotting! The painting of your mom is lovely too, how special! I also like that you put hooks to organize stuff!
francoisetmoiblog@gmail.com
April 26, 2018 at 4:43 pmThank you so much Felicia!
xo Erin
Jamie Gavareski
April 27, 2018 at 12:01 pmLove this so much! planning a similar project in our hallway. Where are your peg rails from?
francoisetmoiblog@gmail.com
May 17, 2018 at 7:59 amHi Jamie! They’re from The Container Store!
Marianne
April 27, 2018 at 12:18 pmAbsolutely lovely! So much work and it really shows. I love the colors you chose.
francoisetmoiblog@gmail.com
May 17, 2018 at 7:59 amThank you so, so much, Marianne!!
Alex
April 27, 2018 at 4:18 pmI love this! Mind sharing where you got the premade pegrail?
francoisetmoiblog@gmail.com
May 17, 2018 at 7:58 amHi Alex! It’s from Container Store!
Melissa
May 9, 2018 at 8:10 amOh my, it’s just beautiful! May I ask where you found the rug? Thanks!
francoisetmoiblog@gmail.com
May 17, 2018 at 7:58 amHi Melissa! It’s from Terrain!