
A Medicine Cabinet Makeover: Refresh the spot in your home where you begin and end each day.
This post was created in partnership with KILZ®. All thoughts and opinions are my own.
It’s a new year, and I’m teaming up with KILZ to give a new look for the spot in our house where we start and end each day: the bathroom medicine cabinet. Since this little spot is so deeply embedded into our everyday routine, I figured it was high time to make it prettier and all around more functional for Ken and me.


We’re a one bathroom household, so this area gets a lot of play. We used KILZ Tribute Paint & Primer in here not only because of the durability and coverage, but this bathroom doesn’t have an exhaust fan (old school, right?), so moisture and mildew resistance is also a must.
Oh AND I wanted a matte finish, and Tribute is one of the most durable matte finish paints available!
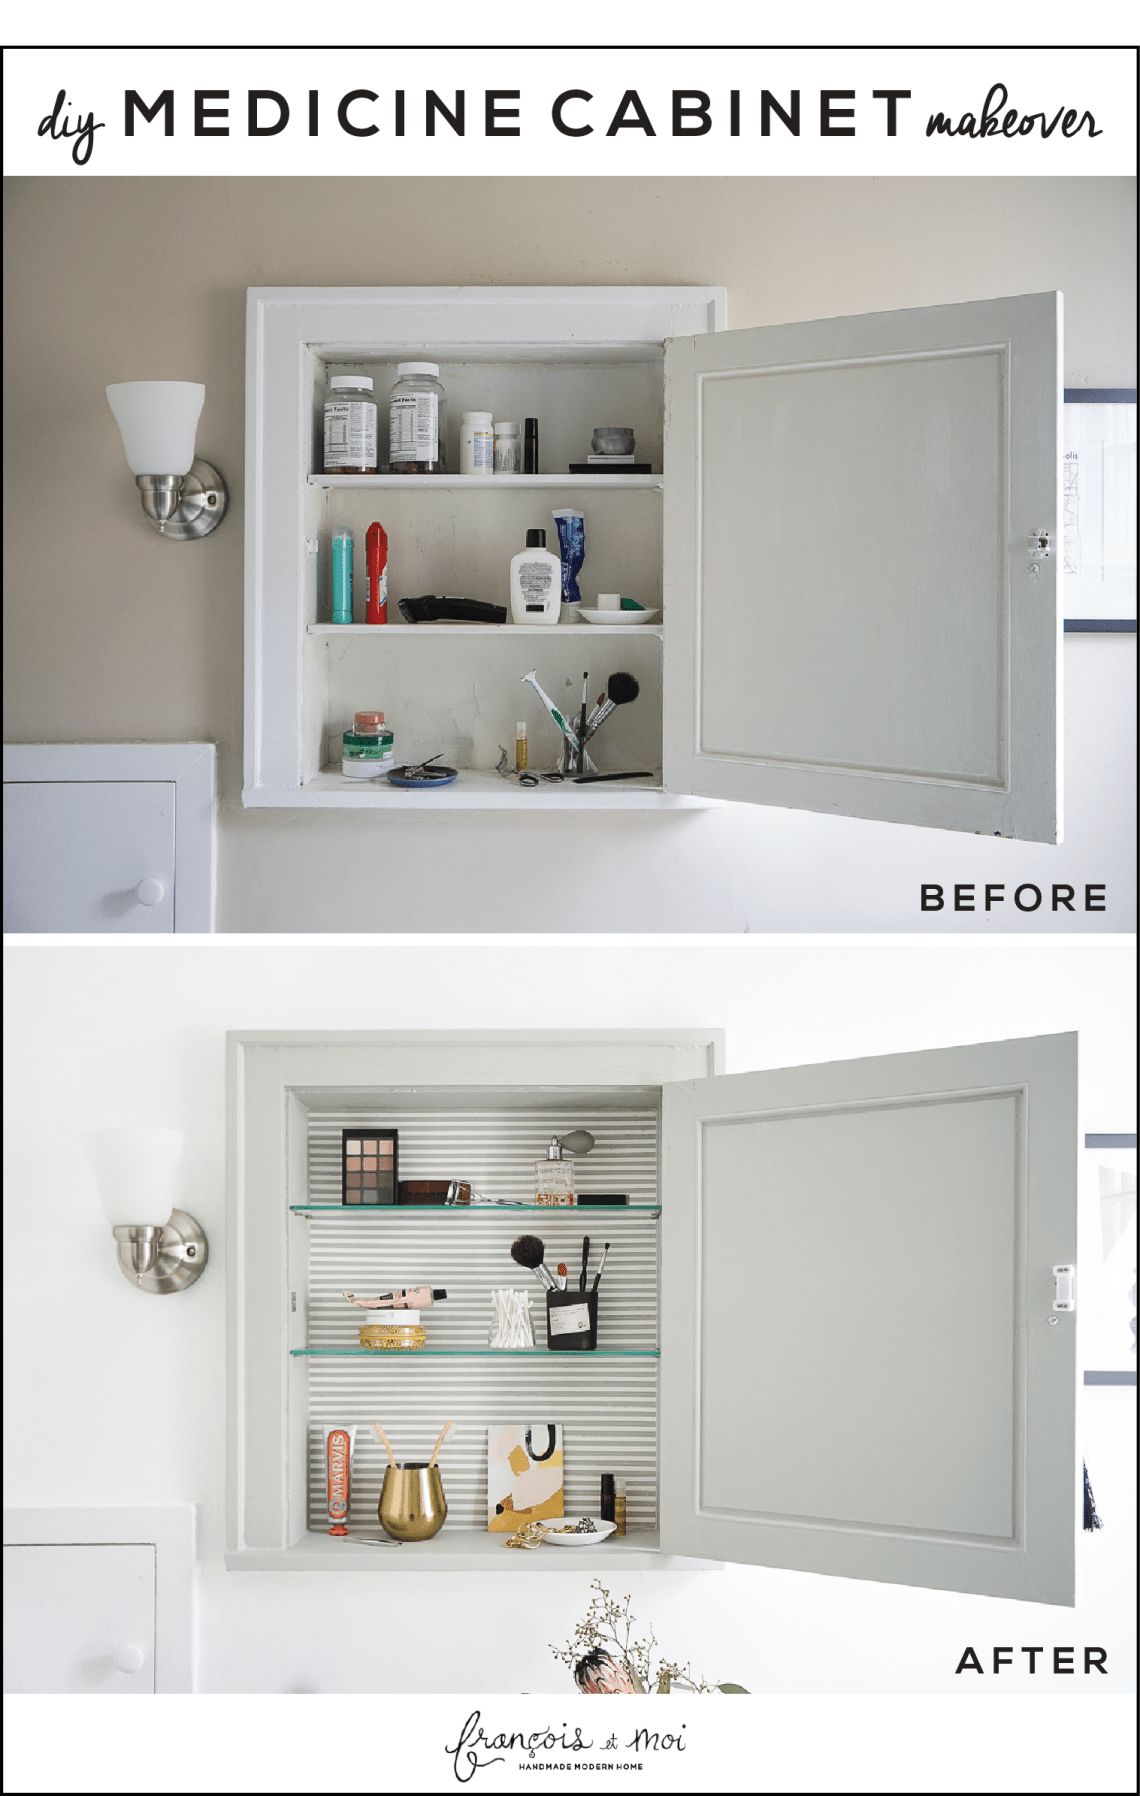
Let’s take a look at the cabinet before the makeover…


Are those dirty, painted white shelves not the grossest thing you’ve ever seen? This makeover is LONG overdue!
My scope was to give the cabinet a fresh coat of paint, add a stripe design to the back wall of the cabinet, update the hardware, and replace the painted wood shelves with glass ones. Easy little updates, with a big overall impact.
If I’m completely honest here, the stripe pattern for the cabinet’s back wall was inspired by my wardrobe. I wear ALOT of stripes; I love them! Stripes add pattern and visual texture, while also remaining gender neutral–not too feminine or masculine. It’s a good reminder to look at other areas of your lifestyle when honing in on your interior decor style.
But enough style analyzing, let’s get started!

Selecting Paint and Gathering Materials
I used the bathroom’s existing tile floor as the jumping off point for paint selections. KILZ Tribute’s Loden Frost was the perfect lighter shade of grey-green for the cabinet, and Ultra Bright White—a pure, classic white—worked great as the supporting accent color. I also liked that Loden Frost works beautifully with both chrome and brass metal finishes as it’ll give us options down the road if we decide to update the faucet and sconces in here.
This was my first time ordering paint online (I ordered it from Amazon.com). Honestly, I was a little nervous not being able to see the paint color in person first, especially since I was trying to coordinate with the floor tile, but the KILZ website shows installation shots of each paint color in several different interior locations giving you a well-rounded idea of the color’s essence. Amazon also sells small sample sizes in case you really can’t commit without seeing it first!
I ordered lots of test samples for our back hall makeover project, but for this project, I just went for it and the color was perfect.

Here’s an overview of the materials I used on the cabinet update:
- KILZ Tribute Matte Paint and Primer in two colors: Loden Frost TB-73 and Ultra Bright White TB-01
- 120 & 220 grit sand paper
- High quality painter’s tape
- 1/4″ painters tape for creating stripe pattern
- Foam brush
- Paint pan
- Wood filler
- Putty knife
- 1/8” thick hardboard
- Skill saw
- Roll of paper, marker, and scissors
- Construction adhesive
- ¼” thick glass shelves (I had them cut at my local Ace Hardware store)
- Shelf pin pegs
- Magnetic latch
- Cordless drill
- Paintable caulking

Cabinet Prep
I started the update by clearing out the cabinet, removing the horrible painted wood shelving (yuck!), pegs, ineffective cabinet latch, and unscrewing the cabinet door.
Then I did a little bit of sanding to remove the chipping paint. I wanted to keep the sanding to a minimum as our house was built in the 1930’s, and I’m 99% sure there’s lead paint somewhere underneath the layers of paint. So I hung a plastic drop cloth over the door, wore a face mask and only sanded areas that were chipping.
I used 120 grit sand paper for rougher areas and 220 grit sandpaper for the entire surface to ensure good paint adhesion. In the picture above, you can see I used a sanding block as well. This isn’t necessary, but you’ll be able to a bit larger area all at once, and it’s also easier on your hands. You can also use a 2×4 piece of wood if you don’t have a sanding block.
If you’re unsure whether you’re dealing with lead paint, you can use a lead paint test kit. 3M makes an affordable and easy to use test.
Finishing up with cabinet prep, I filled in the unwanted screw holes, divots, etc. with wood filler, and lightly sanded those areas as well.


Creating the Backer Board
I decided to use a thin board to line the back wall of the cabinet rather than painting the existing cabinet back because it was bowing and extremely uneven in some spots to the point where it almost should be skim-coated if left as-is. Since I was planning a striped pattern for the back wall, it ended up being easier to paint a thin board separately, and then attach it to the wall afterwards.
If your medicine cabinet is in good shape, you can probably get away with painting your design right onto the medicine cabinet back wall.
I started by making a template of the back wall using a large piece of paper (wrapping paper). My cabinet isn’t perfectly square, so I didn’t feel that taking measurements would be accurate enough. I pressed the paper into the cabinet and outlined the back wall with a marker. Then I cut out the template, traced it onto the hardboard and used a skill saw to cut out the rectangle.
Once the rectangle was cut, I gave the backer board a coat of KILZ Tribute Ultra Bright White, and let it dry. Then I applied ¼” wide painting tape in horizontal stripes spaced ¼” apart, pressing down firmly as I went. The taping itself is probably the most tedious part, but I stuck with it, and I’m glad I did!

Painting the Cabinet
Next, I taped around the cabinet molding and mirror, cracked open the paint can, and started painting!
Since KILZ Tribute is a paint + primer, there was fantastic coverage and the cabinet only needed one coat.
After painting the cabinet, I made the game-time decision to also paint the walls in here. I knew I’d have enough leftover white paint, and let’s be honest, the cabinet wasn’t the only thing needing a makeover. Those beige walls weren’t doing this bathroom any favors!


Finishing Touches
Once the cabinet and the backer board were completely dry, I used construction adhesive to attach the striped board to the back wall of the cabinet.
The board fit snugly into the cabinet, but there were a few areas with minor gaps between the board and cabinet walls, so I used some paintable caulking to finish off the perimeter of the board. For the caulking application, you basically apply on a small bead of caulking along the edge of the board where it meets the cabinet, then use your finger to smooth out the caulking bead. Repeat with the remaining 3 sides of the board.
Other final touches included tapping in the new shelf pegs, attaching the new magnetic cabinet latch, and reattaching the door and hardware. I originally planned to replace the cabinet knob, but realized it was probably original (and in good shape), so decided to keep it.

Lastly, in went the glass shelves I had cut at my neighborhood hardware store. Cue angelic chorus! No more dirty painted wood shelves. Ah! So pretty. I changed the shelf spacing so there was more room at the bottom. I’m hoping to invest in electric toothbrushes this year (#resolutions!) and wanted to make sure there’d be enough room to stand them upright.


Final Thoughts
If you need organizing ideas to help make the most of your newly made over medicine cabinet, Better Homes & Gardens has a comprehensive post on organizing your medicine cabinet. Honestly, they’ve thought of everything. I found it really helpful.
That’s our medicine cabinet makeover from start to finish. Thanks to paint, new glass shelves + hardware, this 90 year old medicine cabinet has a whole new lease on life. And we have a thoughtful and pretty new command center in which to start the day. If you have any questions, please leave them below or shoot me an email. I’d love to connect.
And if you’re looking for more budget renovating/decorating ideas, here are a few of my favorites:
- 4 High Impact Ideas for Small Budget Decorating
- DIY Back Hall Makeover
- No Sew Café Curtain
- Suzannah’s Modern Bath Renovation via Bigger Than The Three of Us


