

I’ve really been inspired by the modern kimono look lately and have been wanting to add one to my wardrobe for fall. Hackwith Design has several gorgeous shapes (she’s out of Minneapolis–check her out!) and The House of Earnest made a killer boho kimono out of a scarf!
Inspired by The House of Earnest’s DIY method, I created a shorter and heavier weight version out of a gorgeous flannel herringbone cotton to layer and cozy up with for fall.
The process is super simple (no pattern needed!), but it does require a bit of sewing (not expert sewing, but beginner sewing). You could also hand sew this piece, but I suspect it would take while!
The technique I’m showing is quite simplified. I’m a beginner sewer and wanted to create a DIY kimono that was approachable for almost anyone (with a sewing machine) to make. If you’re also a beginner sewer, hopefully you find this tutorial helpful and inspiring enough to give sewing a try. Who cares if it’s not perfect? The process is fun, and you made something you can wear!


Materials List:
- 1.75 yards of 43-54″ width fabric. I used a medium-weight 46″ wide cotton flannel, and cut the width down to 43″ wide.
- measuring tape
- scissors
- t-square (optional, but recommended since we’re not using a pattern)
- permanent marker
- sewing pins
- coordinating thread
Special Equipment:
- sewing machine
Step 1. The first order of business is to figure out roughly how long and wide you want your kimono to be. I wanted mine to drop just below my hips at my widest point, and since the arm style of this kimono are wide and slouchy, I didn’t want the width to also be extra wide. This piece is all about balancing proportions! The dimensions I chose were 42″ wide x 28″ long. Write your dimensions down and set aside. Your dimensions will vary depending on your desired fit.
Note: if you would like the front flaps of your kimono to overlap at the front, you’ll want to make your kimono wider than I made mine.

Step 2. Turn the 1.75 yards of fabric inside out, and fold in half horizontally, place the fold running horizontally at the top of your work surface, and measure and mark with a permanent marker your desired width and length using the dimensions you decided on above and cut along one side and along the bottom (non-fold edge) to remove the extra fabric. In my case, it was 43″ wide and 28″ long.

Step 3. Measure and mark two vertical rectangles, one in each lower left and right corners of the fabric. Using a straight edge and permanent marker to draw cutting guidelines.

Step 4. Pin along the inside of the permanent marker lines on both sides, and cut along marker lines.
Step 5. Using 1/4″ seam allowance, sew along the lines you just cut.
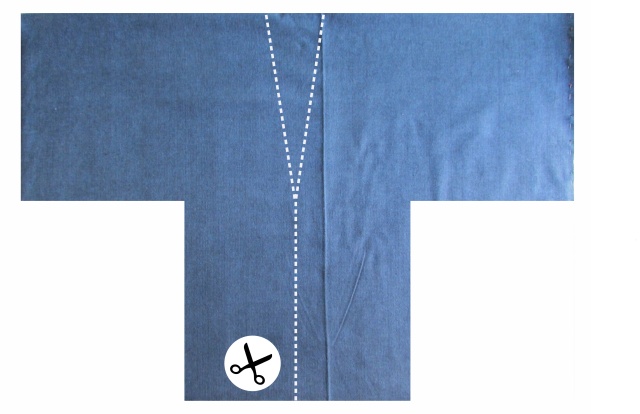
Step 5. Find the center of the bottom of the kimono, and draw with a permanent marker a vertical line up to where the arms begin. Then split the line into a “V” to create a neckline. I also drew in a rounded neckline on the back of the kimono. Cut along permanent marker line.

Step 6. At the front opening, bottom hem, and sleeve openings, fold raw edges back roughly 3/8″ and pin into place. Straight stitch edges at 1/4″ seam allowance.
Step 7. Trim all long threads, turn right side out, and layer over your favorite tee and leggings for fall!


Tasha
September 4, 2014 at 9:24 amOMG adorable, you clever lady!
Love Hackwith Design, just a little out of my budget, unfortunately!
francoisetmoi
September 5, 2014 at 7:40 amMine too! 🙁
Nina
September 4, 2014 at 10:48 amTotally lovely! Very impressed. Where do you like to buy your fabric?
francoisetmoi
September 5, 2014 at 7:46 amThanks Nina! I love SR Harris–a designer fabric outlet in Brooklyn Park, but the fabric for the kimono came from Joann Fabrics. Where do you go for fabric?
Nina
September 5, 2014 at 8:15 amI’ve been a Treadle Yard Goods devotee since doing my class their. The fabrics are beautiful and very high quality, but a bit on the spendy side. 🙂 I’ll have to check out SR Harris!
Gracie K. Harold
September 4, 2014 at 1:04 pmLove this! Brilliant!
francoisetmoi
September 5, 2014 at 7:41 amThank you Gracie! 🙂 Have a great weekend!
Bonnie Eng
September 5, 2014 at 1:07 amWow, very impressive! Love this idea!
francoisetmoi
September 5, 2014 at 7:41 amThank you Bonnie! 🙂
Jeff
September 5, 2014 at 7:58 amIt looked so cute on you yesterday!!!
francoisetmoi
September 5, 2014 at 7:59 amThank you! It was so fun to sport something I made myself!
livfaybell
September 5, 2014 at 4:28 pmThis is gorgeous! I can’t wait to try this out.
Sandi
September 6, 2014 at 7:19 amI am soooo impressed!
francoisetmoi
September 6, 2014 at 10:04 amThanks Mom!!!!!!!
Creative DIY Craft Projects Ideas & Inspiration
September 25, 2014 at 8:19 am[…] Handmade Heathered Kimono […]
Julie
October 2, 2014 at 10:18 amSuper cute!!
Sandra De Alejandro
September 25, 2015 at 4:59 pmLove it! Ingenious.
Kathy
April 27, 2016 at 6:41 pmHi Erin. Very nice job, I’m wanting to make one of these but I’m very obese; my question is:
In order to know how much fabric I need, can You tell me how much extra fabric I need above my measurements? ie: if hips are 36″ how wide is the material? Appreciate any help you can give me. Thanks Kathy
Jill Lindenberg
September 26, 2016 at 7:33 pmI followed your same dimensions for my daughter’s kimono. I would have made it wider, as it came out very slim in the body. I didn’t expect to overlap it (as you said it didn’t overlap), however, I didn’t expect it to be that narrow in the body. Doesn’t even come close to covering the middle. Also, making the sleeves without any kind of darts, does make the shoulders lay really bulky (& funny looking). Just my opinion in case others decide to make as instructed. Yes, it was very easy, but I wish I would have looked for a more developed pattern.