
This post is part of an ongoing series, Francois Renovates. Find the other posts in this series Here, Here, Here & Here
At long last, here are the Before & After details of our DIY kitchen renovation! A majority of the project wrapped up in October, but finishing up those last little details has been like pulling teeth for Ken and I. After a 3 month renovation, the last thing we felt like doing on a Saturday morning was caulking crown molding and touching up the trim paint. Alas, though, it’s finished, and ah, does it feel good. Check out the Before and After shots below!


So let’s rewind back to July 2015 and look at the kitchen when we bought the home. At first glance, the fully inset cabinet doors were in great condition, and I thought we might be able to get away with a coat of paint on them. But the inside of the cabinets were a much different story. They were a spider-infested, layer-upon-painted-contact-paper mess.
The North wall of the kitchen consisted solely of a refrigerator, a free-standing stove, and that’s about it! The kitchen also didn’t have a dishwasher, much counter space or task lighting to speak of. But what it did have was a plastic hammered tin-looking backsplash stuck to the wall with double-stick tape. (Yaaass!) You just can’t make this stuff up!
The heating element in the kitchen was an old rusty radiator underneath the sink that looked like it hadn’t been cleaned or even touched in decades. Its warm and moist location made it the perfect spider reproduction epicenter (lots of egg sacks in there–yuck, right?). We also found cat toys, an old bank check, and cooking utensils in the radiator, which afforded glances into who the previous owners may have been.

As you may have guessed, we tore out the cabinets and radiator. Don’t worry though, we refurbished the cabinets and found another use for them in the house–they’re not in a landfill. More to come on those cabinets later! As for the rusty radiator and the spiders who call it home, they’re in the garage until we can clean it up and sell it. For a look at that old radiator and to learn more about our goals for the kitchen, head over here.
In place of the bulky radiator we added a “Toester” Classic T6/8 heating unit which connects into our boiler system, and is low profile enough to fit into the toekick area under the sink cabinet. Using a low profile unit allowed us to regain the storage space under the sink, and in a small kitchen every little bit helps!
The one element I couldn’t part with from this kitchen though, were the slatted doors under the sink. They just don’t make pieces like this anymore (or if they do, they’re beaucoup bucks), so we purchased extra cabinet lacquer & new hardware to refinish them to match the new cabinets.
Francois et Moi’s DIY Kitchen Reveal
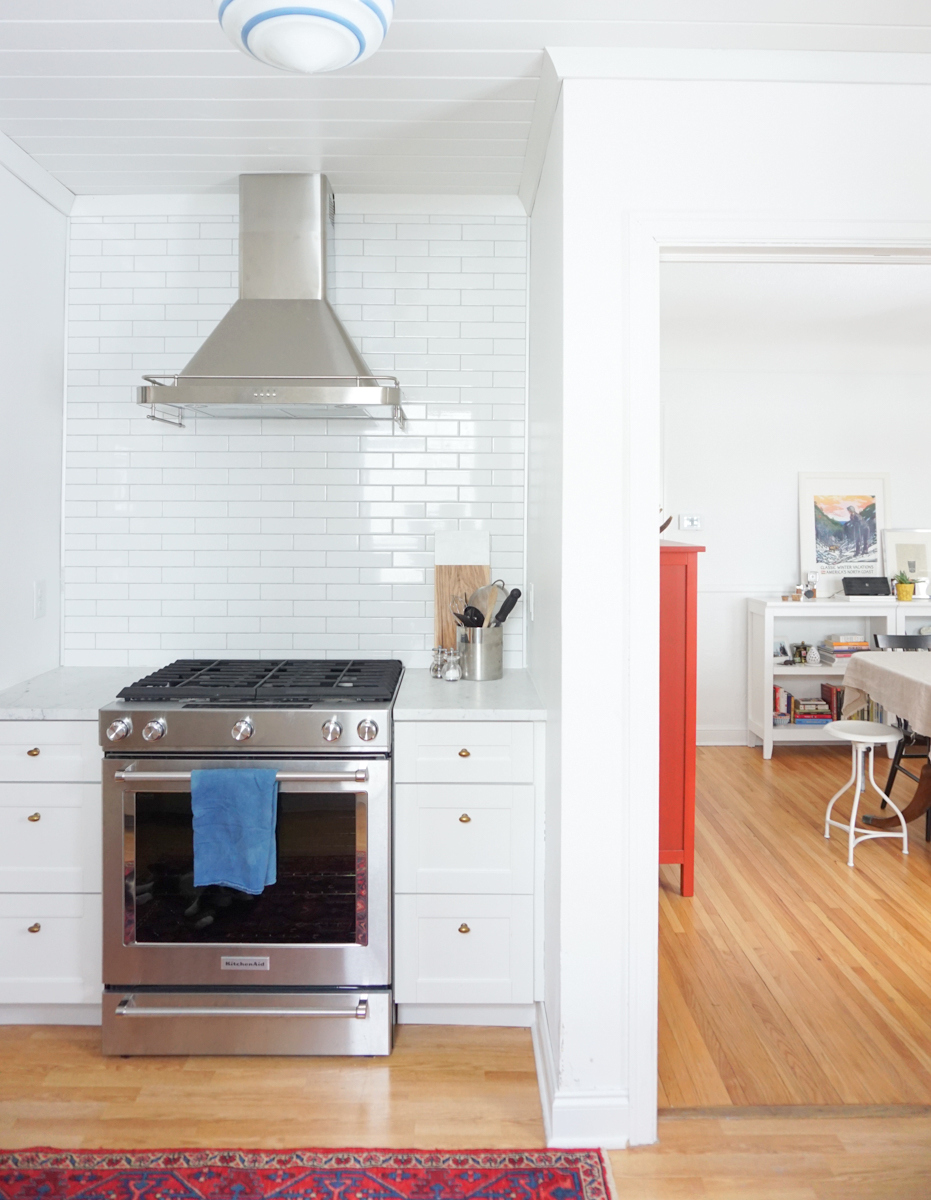
And drumroll please…here’s the After!


My husband, Ken, is a commercial construction manager, so he kept a tight budget spreadsheet throughout the renovation. However, the one thing we forgot to include in the budget was cabinet hardware (eek!). Though it seems like a small piece of the pie, hardware really starts to add up when you think about how many units you need even in a small kitchen.
I was dead set on satin in or unpolished brass hardware, and after a ridiculous amount of time searching online, I was at the conclusion that affordable (less than $5 ea.) satin brass hardware didn’t exist. Then I came across the Liberty Artesia Collection on Pinterest, and bingo! See all the sources at the bottom of this post for specifics.


That wall column in the corner to the left of the range hood is the chimney stack. Since we couldn’t move it, and believe me, I lobbied for it HARD!, we decided to add an open shelving unit with big drawers at the bottom to the left of it. Our goal with this unit was to take all the things that would typically sit on the counters and stack store them on the shelving (thereby keeping our limited counter space free and workable.) The shelving unit is from the Martha Stewart for Home Depot Office Collection, and not the Kitchen Collection. However, both the collections use the same cabinet styles and finishes, so it was an easy swap-in.

SOURCES:
FINISHES: Cabinets: Ox Hill Doorstyle in Picket Fence White | Marble Work Tops | Elongated Subway Tile | Gold Faucet | Brass Handles | Brass Knobs | Matchbox Sink Cabinet Latch | Range | Hood | Toekick Heater | Wall & Trim Paint: Whisper White | Window Paint: Poppy Seed | Sink Light Pendant | Ceiling Light Fixture
ACCESSORIES: Rug | Clock | Natural Woven Shades | Breville Espresso Maker | Magnetic Knife Rack
EASY DIY PROJECTS: Cutting Board | Indigo Tea Towels
So that’s it for the kitchen folks! Up next we’ll be chatting about the home’s private parts: bedrooms, bath & studio. Check back next Monday!
See more of our home and learn more about our design style on SFGIRLBYBAY!


Tracy
January 18, 2016 at 3:41 pmHi this is a beautiful kitchen but where is your counter space?
I love the idea of stacking microwave etc
Great well done
francoisetmoiblog@gmail.com
January 18, 2016 at 3:45 pmThanks Tracy! I’m not sure I understand your question. We are definitely limited on counterspace in the small space, but we doubled the worksurface area from the old kitchen!
anitapelayorivera
January 19, 2016 at 5:29 amERIN! Hi this is Anita from Instagram:Les Dame D’Abord! Your before photo of your kitchen is JUST LIKE MY KITCHEN! We live in Northeast Minneapolis, and we did a ton of renos here in this charming brick cottage, but the kitchen needs painting and I’d love to do something with that maple woodwork, like PAINT THEM WHITE!
Fabulous job. I wish we could meet somewhere, maybe at Whole Foods, sometime? I’d love to share our renovation tips! Anita
francoisetmoiblog@gmail.com
January 19, 2016 at 8:39 pmHi Anita! Your charming brick cottage sounds lovely! I’d love to talk reno secrets sometime!
tangabird
January 19, 2016 at 5:56 amYou did an awesome job!!!
Heather
January 19, 2016 at 7:32 pmThe link for your over the sink pendant light comes up as paint colors from Home Depot. Any chance you could tell me where you got it from? Thanks!!
francoisetmoiblog@gmail.com
January 19, 2016 at 8:33 pmHi Heather! Thanks for letting me know. It’s all fixed!
Ginger
January 20, 2016 at 4:45 pmHi Erin,
My name is Ginger and I work for Architectural Antiques. We are a company that specializes in restoring antique architectural elements and recently, I’ve been researching design trends and looking at the top designers/taste makers/bloggers in the Twin Cities and of course, found you! We love your style and find it very inspiring! I was curious if I could include you and your work as the authority of Minnesota interior design style in my blog post? And if so, do you have any advice or input about my current project- a feature I am writing about a distinctive Minnesota interior design style?
Thank you so much for you time and please feel free to contact me with any questions.
Best,
Ginger, Design Intern
Architectural Antiques
francoisetmoiblog@gmail.com
January 21, 2016 at 8:30 amThanks Ginger, Absolutely! Is your email media@archantiques.com? If so, I’ll email you over there.
Ginger
January 25, 2016 at 4:33 pmYes, media@archantiques.com is my email. Thanks again and have a nice day:)
linda
January 24, 2016 at 11:42 pmhi erin! it’s linda from instagram @lindakfinley … oh. my. goodness. such a gorgeous kitchen!! I love every bit .. the crisp white, warm brass, elongated subway tile, built-ins and cabs .. all of it just so lovely! and I also went to victoria’s blog to see your home ~ incredible, you two did an amazing job! .. absolutely beautiful 🙂
francoisetmoiblog@gmail.com
February 4, 2016 at 11:44 amThank you so much Linda! You just totally made my day. Have a great weekend ahead!
Nicole McCarthy
January 25, 2016 at 3:17 pmWow I love a good “Before” and “after”! The colour for the windows is brilliant. You’ve given me a great idea. Brilliant job. The hard work shows. Nicole. p.s. I’m loving the series.
francoisetmoiblog@gmail.com
February 4, 2016 at 11:40 amThank you Nicole! Hope all is well with you!
Denise
January 30, 2016 at 8:41 amOh! In the midst of a kitchen remodel and have been searching endlessly for the perfect brass hardware. This is it! Ordered, delivered and love! Thanks so much for the source. I am eternally grateful. Your kitchen and blog are beautiful. Congrats on your project(s)!
Kristin Smith
February 8, 2016 at 4:40 amWhat a lovely transformation! Your new kitchen looks so fresh! Love the pulls!
francoisetmoiblog@gmail.com
February 8, 2016 at 8:44 amThank you Kristin! xo Erin
Before & After: A Tudor Kitchen Catches Up To The Times - Tmarie Linens
September 19, 2016 at 12:05 pm[…] (Image credit: Erin Francois) […]
Before & After: A Tudor Kitchen Catches Up To The Times – Sofia Consola
September 19, 2016 at 12:13 pm[…] (Image credit: Erin Francois) […]
Before & After: A Tudor Kitchen Catches Up To The Times | Property Soup
September 19, 2016 at 1:23 pm[…] (Image credit: Erin Francois) […]
Erin Shares Everything About Her $18K Kitchen Renovation – Sofia Consola
September 19, 2016 at 2:47 pm[…] (Image credit: Erin Francois) […]